Amazon Seller User Permissions: A Quick And Easy Guide 2026

Introduction
Running an Amazon store is fantastic, but let’s face it: it can be exhausting! Between keeping an eye on inventory, chasing sales, and dealing with those numerous customer inquiries, who has time to relax? Don’t worry, you’re not alone!
Maybe you’re considering sipping on a piña colada while your online business continues. Sounds like an ideal vacation, right? Well, it can be a reality! You can catch your breath without missing a beat by sharing the load with a trusted helper or friend.
You really deserve a break, but before anything else, start learning how you can add a user to your Amazon Seller Central account so that while on the go, your business will still be up and running. Continue reading this blog to learn about it!
What Are Amazon Seller User Permissions?
In Amazon Seller Central, user permissions are crucial in managing access levels for various individuals associated with a seller’s account. This feature allows sellers to maintain control over their accounts while delegating specific tasks to co-owners, employees, contractors, and other authorized users. By effectively utilizing user permissions, sellers can enhance their operational efficiency and collaboration within their teams.
Overview of User Permissions
User permissions in Amazon Seller Central are designed to provide different levels of access to users based on their roles. Sellers can grant these permissions, which is an important distinction from individual selling plans. When a seller first sets up their Seller Central account, they hold exclusive access to all features and tools available on the platform.
Types of Users
There are two primary categories of users within Amazon Seller Central:
- Primary User: This is the account administrator, typically the individual who registered the Seller Central account. The primary user has full access to all pages and features of the account. They can manage user permissions, invite secondary users, and perform all account-related activities.
- Secondary User: These users are invited by the primary user and have limited access. A secondary user can only view and edit the user permissions page if the primary user grants them administrative rights. As admins, secondary users can manage permissions for other secondary users.
Granting User Permissions
The primary user must navigate to the User Permissions section under Settings in Seller Central to grant user permissions. The process typically involves the following steps:
- Inviting a User: The primary user sends an invitation to the new user via email. This invitation contains a link that allows the new user to set up their own login credentials.
- Setting Permissions: Once the user accepts the invitation, the primary user can configure their permissions. This includes determining whether the user has full administrative access, can view specific sections, or has limited access to certain features.
When should a primary user invite secondary users to the Seller Central account?
There are several practical scenarios where user permissions are essential:
- Delegating Responsibilities: Sellers can assign tasks to business partners or employees, allowing them to manage inventory, fulfill orders, or handle customer service inquiries.
- Remote Access: Secondary users located in different geographical areas can be granted access to manage inventory and operations without compromising the account’s security.
- Third-Party Service Providers: Sellers may hire contractors or agencies to manage specific aspects of their business, such as PPC advertising campaigns, while limiting their access to sensitive information.
- Backup Access: In situations where the primary user is unavailable, having secondary users with appropriate permissions ensures that business operations can continue smoothly.
Where to Find the User Permissions Page?
Once you are logged into your Amazon Seller Central account, you can find the User Permissions page by following these steps:
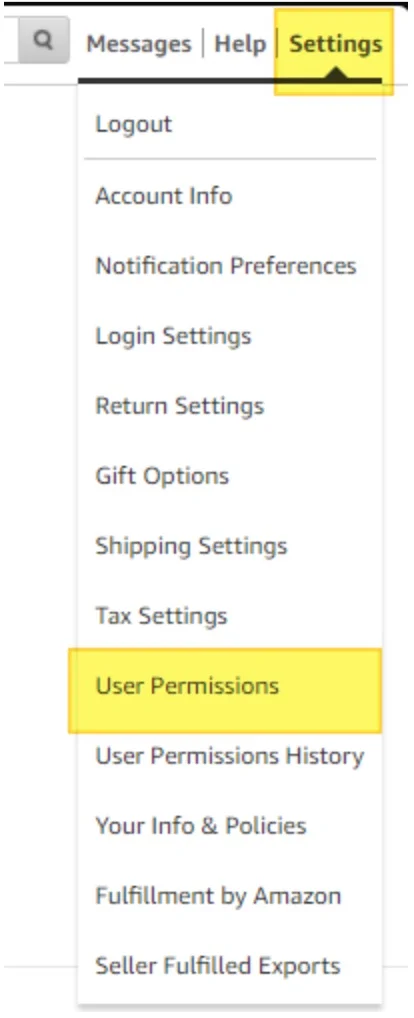
- Locate the Gear Icon: Look for the gear icon situated in the upper right corner of the Seller Central dashboard. This icon is accessible from any page within the platform.
- Select User Permissions: Click on the gear icon, and from the dropdown menu, select “User Permissions.” This will take you to the User Permissions page, where you can invite secondary users and manage existing user access.
The image above illustrates the steps to locate the gear icon and navigate to the User Permissions section. Following these instructions, you can efficiently manage user access and permissions within your Seller Central account.
How to Add Users to Your Amazon Seller Central Account?
Let’s talk about adding users to your Amazon Seller Central account! Sharing your Seller Central account with trusted team members can significantly improve efficiency. Let’s guide you through adding users and setting appropriate permissions. Whether you work with employees, partners, or virtual assistants, we’ll help you optimize your team structure.
As the primary account holder, you can invite other users to your Amazon Seller Central account by following these steps:
- Log in to your Amazon Seller Central account.
- Click on the Settings icon (gear symbol) in the top right corner of the page.
- Select “User Permissions” from the dropdown menu.
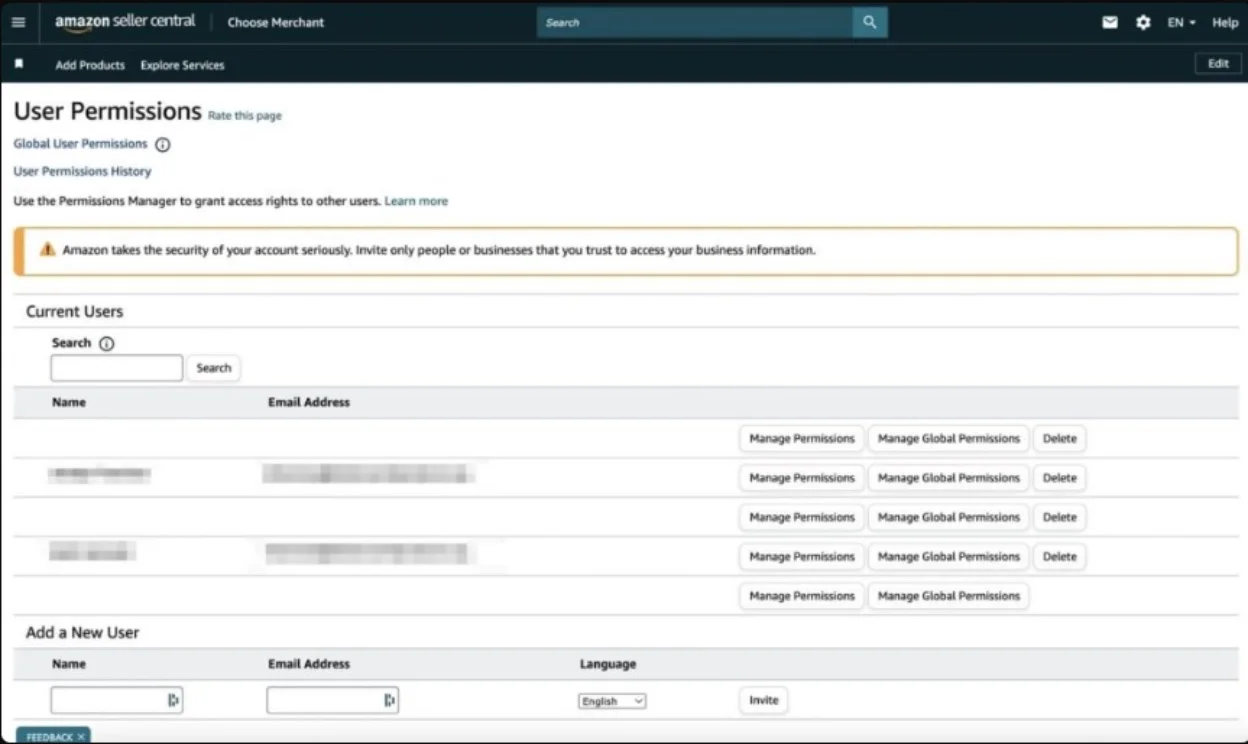
- On the User Permissions page, scroll down to the “Add a new user” section.
- Enter the name and email address of the user you want to invite.
- Click “Send Invitation”. The invited user will receive an email with instructions to accept the invitation.
Once the user accepts the invitation, their name will appear under the “Current Users” section of the User Permissions page.
Managing User Permissions
After inviting a new user, you can manage their access level to your Amazon Seller Central account. To do this:
- Click on “Manage Permissions” next to the user’s name.
- Select the appropriate permission level for each section, such as “View”, “View & Edit”, or “Admin.”
- Click “Continue” to save the changes.
By default, new users will have no access until you assign permissions. It’s important to carefully consider which permissions to grant based on the user’s role and responsibilities.
Types of User Permissions
Amazon Seller Central offers the following user permission levels:
- No Access: The user cannot view or edit any information.
- View: The user can view but not edit information.
- View & Edit: The user can view and edit information.
- Admin: The user has full access and can manage other users’ permissions.
As the primary account holder, you can customize permissions for each user based on their needs and preferences. By effectively managing user permissions, you can optimize your Amazon selling experience and focus on growing your business.
All in One Software
for Book Sellers
Scout Better – List Faster – Reprice Smarter
Over 30% Business Growth
Achieved by Our Clients
What Are The Different User Permission Levels?
Amazon Seller Central provides different types of user permissions to meet the needs of sellers. Here’s a simple breakdown:
- Administrative Permissions: This level gives users full access to all features in Seller Central. Administrators can manage finances, inventory, product listings, and account settings. It’s important to be cautious when granting this access, as it can greatly affect your account’s operations.
- Permissions by Section: Sellers can allow access to specific parts of the account, like Inventory, Orders, or Advertising. This way, users can focus on certain tasks based on their expertise.
- Limited Access Permissions: This option gives users restricted access to only certain features. It’s perfect for those who need to perform specific tasks without seeing sensitive information.
By offering these various permission levels, Amazon helps sellers maintain control over their accounts while allowing collaboration with team members. This flexibility ensures that sellers can work effectively while keeping their accounts secure.
After You Add A User to Your Amazon Account – What Happens Now?
Once you’ve added a new team member, ensuring they’re equipped to manage your Amazon store effectively is essential. Provide clear guidance on navigating the Seller Central dashboard, especially for those new to the platform. Always prioritize account security by sharing only necessary information and monitoring activity closely.
To maintain excellent customer service, encourage your new team members to gather and respond to customer feedback actively.
Enhance Your Amazon Business Process With Bookz Pro

Amazon Book Reselling Blueprint
Read now, explore our full guide. Your revolution starts here. Subscribe to get the blueprint!
Bookz Pro is here to make your Amazon book-selling business a breeze! Our all-in-one platform is designed to help you work smarter, not harder. With our listing software, you can quickly add products to your listings in no time. And our automated repricing feature ensures your prices stay competitive, even when you’re busy with other things.
And the best part? We’ve got your back with our step-by-step guide that reveals the secrets to success in book reselling. Just like many other booksellers who have grown their businesses with our help, you too can thrive with Bookz Pro and our FREE guide.
Conclusion
Managing user permissions in Amazon Seller Central is essential for streamlining your operations and ensuring your business runs smoothly. By understanding how to add users, assign appropriate permissions, and maintain security, you can effectively delegate tasks and enhance collaboration within your team. This not only helps you focus on growing your business but also allows you to enjoy peace of mind, knowing that your account is in good hands. With the right tools and strategies, you can optimize your Amazon selling experience and pave the way for success.
Frequently Asked Questions
Can I remove a user from my Amazon Seller Central account?
Yes, you can easily remove a user. Just go to the User Permissions section, find the user you want to remove, and click on the “Remove” option.
Is there a limit to the number of users I can add to Amazon Seller Central?
No, there is no limit. You can add as many users as you need, each with different permission levels based on your requirements.
How do I edit a user's permissions?
To edit a user’s permissions, go to Settings, then User Permissions. Find the user you want to change, click “Edit,” and adjust their permission levels.
Can multiple users access Seller Central at the same time?
Yes, multiple users can access Seller Central at the same time as long as they have the right permissions. Just keep in mind that some actions may need exclusive access.
What happens if I accidentally delete a user?
If you accidentally delete a user, you can try to restore their access by reaching out to Amazon Seller Support for assistance.